How to Create and Present If You Give a Mouse a Cookie
If You Give a Mouse a Cookie by Laura Numeroff
This is one of the first stories I ever created for the apron and it continues to be one of my favorites to present. I think this is the one I saw Caroline Feller Bauer demonstrate many years ago. Ms. Numeroff has written other books along this line such as If You Give A Moose A Muffin and If You Take A Mouse To The Movies, but this one, in my humble opinion, is the one best suited to an apron presentation.
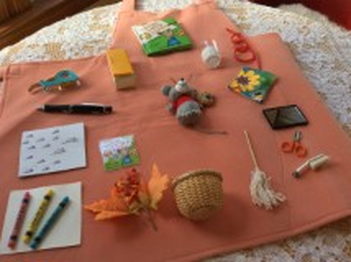
This is also one of the easiest stories for you to remember because each object will remind you of the next part of the story. Lay out all of the pieces to the story on a table in a circle, just as you will place them on the apron. Cover it before the children arrive because they won’t be able to leave them alone. Place the objects on the apron in this order (with my suggestions for creating or purchasing the objects):
1. The Mouse goes in the center. At first I used a likeness I created of the mouse from the cover of the book. Now I use a cute little stuffed mouse I came across somewhere. If you purchase a soft cover copy of this book (and you should), you can cut out the mouse (carefully) from the front cover. Then, after you have highlighted the book with the class, the mouse can jump off the cover onto your apron! The kids love that!
2. The Cookie is placed at the end of the outstretched hand of the mouse, as though he’s holding it. I have used a picture of a chocolate chip cookie from the Sunday ads, but now I use a real Famous Amos cookie (one of the minis) and it’s just the right size. To preserve it, glue it to cardboard and paint it with white glue, let it dry, and paint it again, several coats. It should dry clear. It needs to dry completely between coats, so plan ahead. After it’s dry, I cut around the circle of cardboard attached to the bottom of the cookie and place a piece of Velcro on the back of the cardboard. You can use the rest of the box of cookies to offer each student a “mouse cookie” at the conclusion of the story time.
3. The glass of milk (he needs milk if he has a cookie) is the first object placed on the upper outer edge of the apron and the first object that will begin the circle. I have used a picture cut from a magazine in the past. Now I use one made of felt because I found it in a felt kit. If you can't draw a glass, look for pictures in coloring books. Hand colored is the most interesting for the children, but a picture cut from magazines or the Sunday paper are also good for a comment – “Hey you got that from a paper, didn’t you?”
4. The napkin (so he can wipe his face) comes next, beginning a line of objects down one side of your apron. Depending on the color of your apron, choose a paper napkin that will stand out against it. If you have a dark color apron, use a light colored napkin, etc. If you have something cute, but maybe too big, cut it down. Mine is usually about 3”x3”.
5. The mirror (in the bathroom, so he can see if he has a milk moustache) is placed directly beneath the napkin. If you have a small purse mirror available at home, great, if not, craft stores such as Michael’s and A.C. Moore and fabric stores such as JoAnne’s carry small packages of mirrors. I use 2” round ones in my workshops and kits when I can find them in the stores.
6. Next come the scissors (to trim his hair), placed on the apron below the mirror. I had always used little manicure scissors, but when I began traveling on airlines to present workshops, they took my scissors right out of my kit! The scissors are important, too, because the kids will usually say, “Are those real?” (Why that question pops into their heads at this moment, I don’t know. But it does) Now I am using blunt edge children scissors and I don’t think they are half as intriguing as little sharp ones. But I just found a little sewing kit at a dollar store (one of the world’s finest retail ideas, by the way) that has small ones that are sharp looking with bright orange handles.
7. A hand broom (or a whisk broom if that word is familiar to your children), to clean up the mess he made, is usually close to the bottom of the apron. I made mine by cutting off most of the handle of a toothbrush. Again, try to use a toothbrush that contrasts with the color of your apron. Actually, my husband cuts it off somehow. I purchase packages of 10 for $1.00 when I can find them at the dollar store and use them at my workshops.
8. A rag mop (to clean the whole house) usually begins the bottom part of the circle, placed next to the hand broom. You could use pictures of cleaning products from the Sunday ads. That’s what I did for many years. Then I came across this little vacuum magnet, and that’s what I use now, even there’s no mention of a vacuum in the book. It’s too cute to resist. For my workshops, I make a miniature rag mop using various things such as thick string or twine, until I saw an unused mop head at the thrift shop recently. Now my little mops have real mop heads! Use a little stick (a dowel rod or bamboo skewers or a cuticle stick or a wooden lollipop stick, etc) about 5-4” long. Cut the mop head pieces about 3” long. I used 5 pieces for each mop, and when I unravel each one (after the glue has dried), I have 15 strings in each mop head. Use more if you want a fuller mop. Glue (white glue or some kind of craft glue) the 5 pieces to the end of the stick and wrap one (gluey) strand of the same material (about 5” long) around the glued segments, not only to hold them in place, but to make it look like an old fashioned mop. Let it dry, unravel the pieces, cut to whatever length looks good to you (if you wish), put velcro on the widest part, and you have a cute mop for the mouse to use.
9. After all that, the mouse will need a basket to take a nap. If you have nothing small at home, craft stores and fabric stores should have little baskets the right size for a mouse. Use one that has a flat side that will sit well against your apron, like a little Easter basket with a handle. Also, have a little fluff handy to stuff into the basket to make it nice and comfy for the mouse. Fiberfill, or cotton from the inside of a new pill bottle works well (need some Tylenol?) Or cut a little hole in the corner of one of your sleeping pillows and pull out some fluff (just kidding!!) Do not put Velcro on the fluff because you will be stuffing it into the basket. Lately, I have been using fake autumn leaves, telling the children that mice like to sleep in leaves. I just stuff them in the basket roughly. By this time, you have probably reached the other side of your apron and will begin placing objects in a line heading up your apron. So, above the basket will be
10. The book (mouse needs a story to take a nap). When I worked as a school librarian, I used a picture of some interesting book (from one of the many catalogs that arrived at the school) as the cover to my little book. I simply glue it to a little folded piece of cardboard. It looks like a little book, but the children always want to know what’s inside the book. They are always disappointed when I say “Nothing.” That’s still what I use, but now I have a picture of If You Give A Mouse A Cookie. Kids have amazing eyesight, and they notice the coincidence right away. (The internet is very useful for this, especially Amazon.com.)
11. Next place crayons and blank paper (for the mouse to draw a picture) above the book. I glue three crayons onto a piece of white cardboard 3”x3”. Above that I place
12. The finished drawing (created by the mouse): a picture of his mouse family on the same size piece of white cardboard. My picture is very simple - it has one larger and lots of smaller mice ("What a large family!") mouse.
13. The mouse is very fancy and would never sign his name to his drawing with a crayon or a pencil! So you will have to find the fanciest pen in your whole house.
14. Above that is placed a plastic roll of tape (so he can tape his drawing on to the refrigerator). Any tape you have is fine, but I have seen packages of different colored plastic rolls in dollar stores if you want to get fancy. By now, you are at the top of the apron and will place
15. The last item – the refrigerator – next to the first item – the glass of milk, and your circle will be complete, and so will your story. I have included a pattern of a refrigerator (I used one from the Sunday ads for many years) but I found a little plastic refrigerator just the right size among some junk when we moved once. Lucky! Of course, there are such conveniences now like colored copiers. Although, I would not suggest copying the original pictures from the book because not only would it be illegal, but it would be less interesting to the children. Your creativity is a great part of what makes the stories so enthralling for your audience. If you would like to craft an actual refrigerator from cardboard, please email me at mary-elin@hotmail.com and I will send you a cute pattern I have.
This is a bit time consuming to create, so I made 20 kits. Please contact me for more information
This is one of the first stories I ever created for the apron and it continues to be one of my favorites to present. I think this is the one I saw Caroline Feller Bauer demonstrate many years ago. Ms. Numeroff has written other books along this line such as If You Give A Moose A Muffin and If You Take A Mouse To The Movies, but this one, in my humble opinion, is the one best suited to an apron presentation.
This is also one of the easiest stories for you to remember because each object will remind you of the next part of the story. Lay out all of the pieces to the story on a table in a circle, just as you will place them on the apron. Cover it before the children arrive because they won’t be able to leave them alone. Place the objects on the apron in this order (with my suggestions for creating or purchasing the objects):
1. The Mouse goes in the center. At first I used a likeness I created of the mouse from the cover of the book. Now I use a cute little stuffed mouse I came across somewhere. If you purchase a soft cover copy of this book (and you should), you can cut out the mouse (carefully) from the front cover. Then, after you have highlighted the book with the class, the mouse can jump off the cover onto your apron! The kids love that!
2. The Cookie is placed at the end of the outstretched hand of the mouse, as though he’s holding it. I have used a picture of a chocolate chip cookie from the Sunday ads, but now I use a real Famous Amos cookie (one of the minis) and it’s just the right size. To preserve it, glue it to cardboard and paint it with white glue, let it dry, and paint it again, several coats. It should dry clear. It needs to dry completely between coats, so plan ahead. After it’s dry, I cut around the circle of cardboard attached to the bottom of the cookie and place a piece of Velcro on the back of the cardboard. You can use the rest of the box of cookies to offer each student a “mouse cookie” at the conclusion of the story time.
3. The glass of milk (he needs milk if he has a cookie) is the first object placed on the upper outer edge of the apron and the first object that will begin the circle. I have used a picture cut from a magazine in the past. Now I use one made of felt because I found it in a felt kit. If you can't draw a glass, look for pictures in coloring books. Hand colored is the most interesting for the children, but a picture cut from magazines or the Sunday paper are also good for a comment – “Hey you got that from a paper, didn’t you?”
4. The napkin (so he can wipe his face) comes next, beginning a line of objects down one side of your apron. Depending on the color of your apron, choose a paper napkin that will stand out against it. If you have a dark color apron, use a light colored napkin, etc. If you have something cute, but maybe too big, cut it down. Mine is usually about 3”x3”.
5. The mirror (in the bathroom, so he can see if he has a milk moustache) is placed directly beneath the napkin. If you have a small purse mirror available at home, great, if not, craft stores such as Michael’s and A.C. Moore and fabric stores such as JoAnne’s carry small packages of mirrors. I use 2” round ones in my workshops and kits when I can find them in the stores.
6. Next come the scissors (to trim his hair), placed on the apron below the mirror. I had always used little manicure scissors, but when I began traveling on airlines to present workshops, they took my scissors right out of my kit! The scissors are important, too, because the kids will usually say, “Are those real?” (Why that question pops into their heads at this moment, I don’t know. But it does) Now I am using blunt edge children scissors and I don’t think they are half as intriguing as little sharp ones. But I just found a little sewing kit at a dollar store (one of the world’s finest retail ideas, by the way) that has small ones that are sharp looking with bright orange handles.
7. A hand broom (or a whisk broom if that word is familiar to your children), to clean up the mess he made, is usually close to the bottom of the apron. I made mine by cutting off most of the handle of a toothbrush. Again, try to use a toothbrush that contrasts with the color of your apron. Actually, my husband cuts it off somehow. I purchase packages of 10 for $1.00 when I can find them at the dollar store and use them at my workshops.
8. A rag mop (to clean the whole house) usually begins the bottom part of the circle, placed next to the hand broom. You could use pictures of cleaning products from the Sunday ads. That’s what I did for many years. Then I came across this little vacuum magnet, and that’s what I use now, even there’s no mention of a vacuum in the book. It’s too cute to resist. For my workshops, I make a miniature rag mop using various things such as thick string or twine, until I saw an unused mop head at the thrift shop recently. Now my little mops have real mop heads! Use a little stick (a dowel rod or bamboo skewers or a cuticle stick or a wooden lollipop stick, etc) about 5-4” long. Cut the mop head pieces about 3” long. I used 5 pieces for each mop, and when I unravel each one (after the glue has dried), I have 15 strings in each mop head. Use more if you want a fuller mop. Glue (white glue or some kind of craft glue) the 5 pieces to the end of the stick and wrap one (gluey) strand of the same material (about 5” long) around the glued segments, not only to hold them in place, but to make it look like an old fashioned mop. Let it dry, unravel the pieces, cut to whatever length looks good to you (if you wish), put velcro on the widest part, and you have a cute mop for the mouse to use.
9. After all that, the mouse will need a basket to take a nap. If you have nothing small at home, craft stores and fabric stores should have little baskets the right size for a mouse. Use one that has a flat side that will sit well against your apron, like a little Easter basket with a handle. Also, have a little fluff handy to stuff into the basket to make it nice and comfy for the mouse. Fiberfill, or cotton from the inside of a new pill bottle works well (need some Tylenol?) Or cut a little hole in the corner of one of your sleeping pillows and pull out some fluff (just kidding!!) Do not put Velcro on the fluff because you will be stuffing it into the basket. Lately, I have been using fake autumn leaves, telling the children that mice like to sleep in leaves. I just stuff them in the basket roughly. By this time, you have probably reached the other side of your apron and will begin placing objects in a line heading up your apron. So, above the basket will be
10. The book (mouse needs a story to take a nap). When I worked as a school librarian, I used a picture of some interesting book (from one of the many catalogs that arrived at the school) as the cover to my little book. I simply glue it to a little folded piece of cardboard. It looks like a little book, but the children always want to know what’s inside the book. They are always disappointed when I say “Nothing.” That’s still what I use, but now I have a picture of If You Give A Mouse A Cookie. Kids have amazing eyesight, and they notice the coincidence right away. (The internet is very useful for this, especially Amazon.com.)
11. Next place crayons and blank paper (for the mouse to draw a picture) above the book. I glue three crayons onto a piece of white cardboard 3”x3”. Above that I place
12. The finished drawing (created by the mouse): a picture of his mouse family on the same size piece of white cardboard. My picture is very simple - it has one larger and lots of smaller mice ("What a large family!") mouse.
13. The mouse is very fancy and would never sign his name to his drawing with a crayon or a pencil! So you will have to find the fanciest pen in your whole house.
14. Above that is placed a plastic roll of tape (so he can tape his drawing on to the refrigerator). Any tape you have is fine, but I have seen packages of different colored plastic rolls in dollar stores if you want to get fancy. By now, you are at the top of the apron and will place
15. The last item – the refrigerator – next to the first item – the glass of milk, and your circle will be complete, and so will your story. I have included a pattern of a refrigerator (I used one from the Sunday ads for many years) but I found a little plastic refrigerator just the right size among some junk when we moved once. Lucky! Of course, there are such conveniences now like colored copiers. Although, I would not suggest copying the original pictures from the book because not only would it be illegal, but it would be less interesting to the children. Your creativity is a great part of what makes the stories so enthralling for your audience. If you would like to craft an actual refrigerator from cardboard, please email me at mary-elin@hotmail.com and I will send you a cute pattern I have.
This is a bit time consuming to create, so I made 20 kits. Please contact me for more information